Monday, 18 May 2015

Vermicelli Pulao / Semiya Pulao


Vermicelli / Semiya is one such ingredient which cooks fast and can be made in no time. Vermicelli /Semiya Pulao is a quick and easy breakfast dish .. We can add many vegetables to make it rich. The flavor of vegetables cooked with semiya and whole garam masala along gives a favorable and divine taste to this dish.
                      This delicious Vermicelli Pulao / Semiya Pulao is  good and healthy  tiffin for kids lunch box. I am delighted to be sending this recipe to Indusladies Kids Lunchbox Recipes Book Event. 

                                                             http://www.indusladies.com/food/kids-lunch-box-recipes/ 
            
Ingredients :-

    Vermicelli /Semiya - 2 cups,(roast in 2 tsps ghee on low flame ) till golden brown
    Onion - 1, large, chopped
    Carrot - 1, medium , peeled and diced
    Potato - 1, medium , peeled and cubed (optional)
    Green peas - 1/4 cup (I used Frozen one)
    Green chillies -2
    Bay leaf - 1(optional)
    Mustard seeds - 1/4 tsp
    Cumin seeds - 1/2 tsp
    Cloves - 2
    Cinnamon stick - 1"
    Green cardamom - 1
    Garam Masala Powder - 1/2 tsp
    Coriander Powder - 1/2 tsp
    Turmeric powder - 1/8tsp
    Ginger-garlic paste - 1tsp
    Oil - 1 tbsp
    Ghee - 1 tbsp
    Water - 3 1/2 cups 
    Cashews - 8(broken)(optional)
    Salt to taste
    Coriander leaves for garnish

Method:-


 First wash and chop the onions, carrot ,potatoes and other vegetables which you are using.


Heat a pan or heavy bottomed vessel and add 2 tsps ghee and roast the semiya on low or medium flame till it turns golden brown color.Remove semiya in a plate.


Heat ghee +oil in same pan , once its hot, add cinnamon stick, caradamom, cloves and bay leaf and saute for few seconds. Add  mustard seeds . When mustard seeds start popping add cumin seeds and allow to splutter. 
Then add chopped green chillies.


Add chopped onions and saute till onion becomes transparant . 
Then add ginger garlic paste and saute for 10 seconds.
Add mixed vegetables and stir fry on medium flame and saute for 8-10 mins till all vegetables are cooked. Add green peas and stir well.


Add water to the cooked vegetables along with salt to taste.Add  Turmeric powder ,Garam masala powder ,coriander powder,  and mix well.


When water starts to boil add roasted semiya and give quick stir.
Reduce the flame, place lid and cook till the semiya and vegetables are completely done.
Remove lid and mix well.
Remove the semiya pulao to a serving bowl and garnish with fresh chopped coriander leaves. 


The Delicious Semiya /Vermecilli Pulao is now ready to serve or ready for lunch box !!!
Serve with Raitha or can be eaten itself.

Medu Vada / Garelu / Vadai /How to make medu vada step by step

Medu Vada is a traditional favourite dish of south india .No festive meal or special occasion meal is complete without this classic dish ‘Garelu’ or ‘Medu Vada’ in most of the South Indian homes.
If you are making it for any festival, Make few without onions to offer God. Then add onion to remaining batter.It is my daughter's one of the favorite dish.

Recipe type: Breakfast, snacks ,Festivals
Serves: 15-16 Medium sized medu vadas


Ingredients :-

Urad dal/split black gram /Ulutham paruppu /Minappapu - 2 cups 
Big onion – 1 (Finely chopped) 
Green chillies - 5 (chopped) . 
Ginger / Adrak - 1 inch piece (finely chopped)
Curry leaves - 2 sprig (chopped)
Peppercorns /Kalimirch /Mirayalu -6 to 8 (whole /crushed)
Salt to taste 
Water As needed 
Oil for deep frying  

Method:-

1) Clean, wash and soak the urad dal for 5 hours or overnight. 


2) Strain the water from the dal.Add chopped chillies,ginger,pepper,curry leaves and grind in a mixer to a smooth batter sprinkling very little water if required. 
3) Don’t grind all the dal at once, use small portions to grind batch wise as its easier to grind into a soft batter.
4) Add salt while grinding to make a fluffy batter.
5) The batter should be fluffy, thick and not liquidy.To see the right consistency of batter is to add a few drops of batter in a bowl of water. If the batter drops  floats and do not get dissolved, then that's the right consistency of batter.
6) Then add finely chopped onions to the batter and mix well and keep aside .
7) Heat enough oil in kadai /deep frying pan.


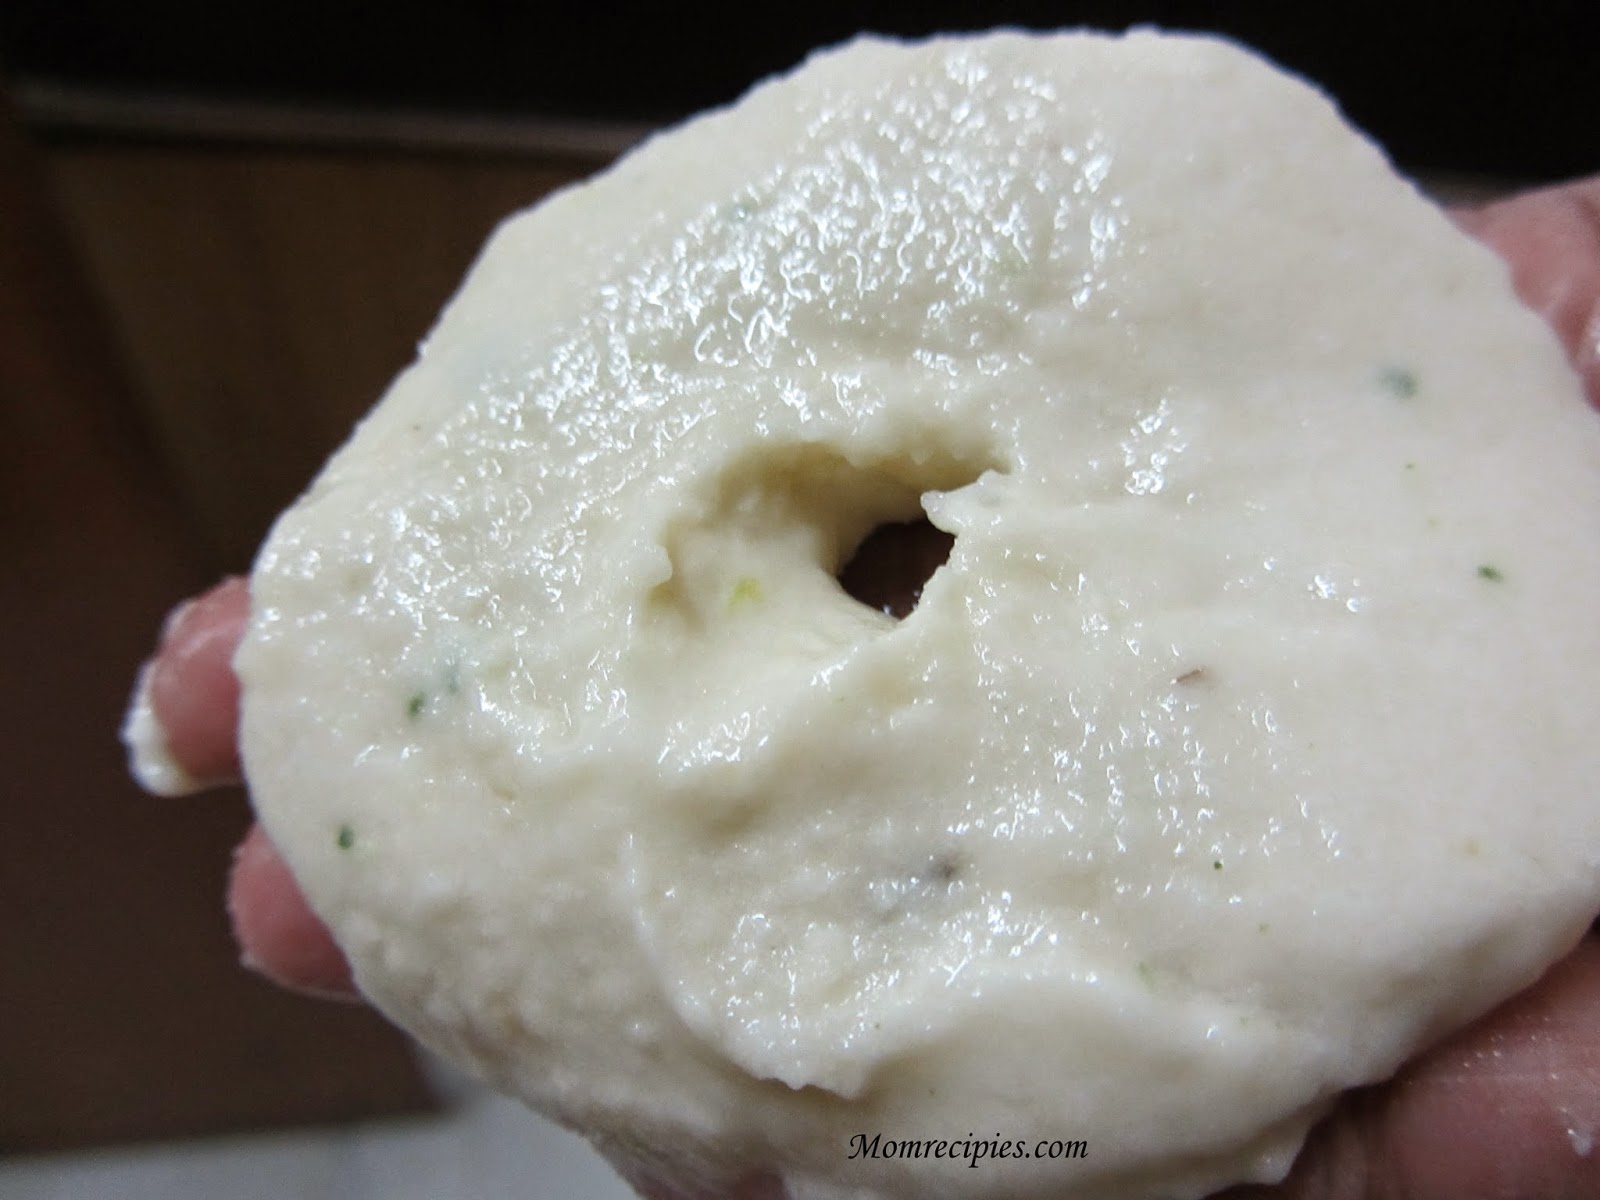
8) Take a bowl of water. Wet your hands with water and take lemon sized ball and flatten it into a vada on a banana leaf or zip loc bag or thick plastic cover.
Make a hole in the center of the vada so that it cooks evenly all over.
OR
 Take some batter in your right hand from the bowl. give it a round shape. With your thumb make a hole in the center.

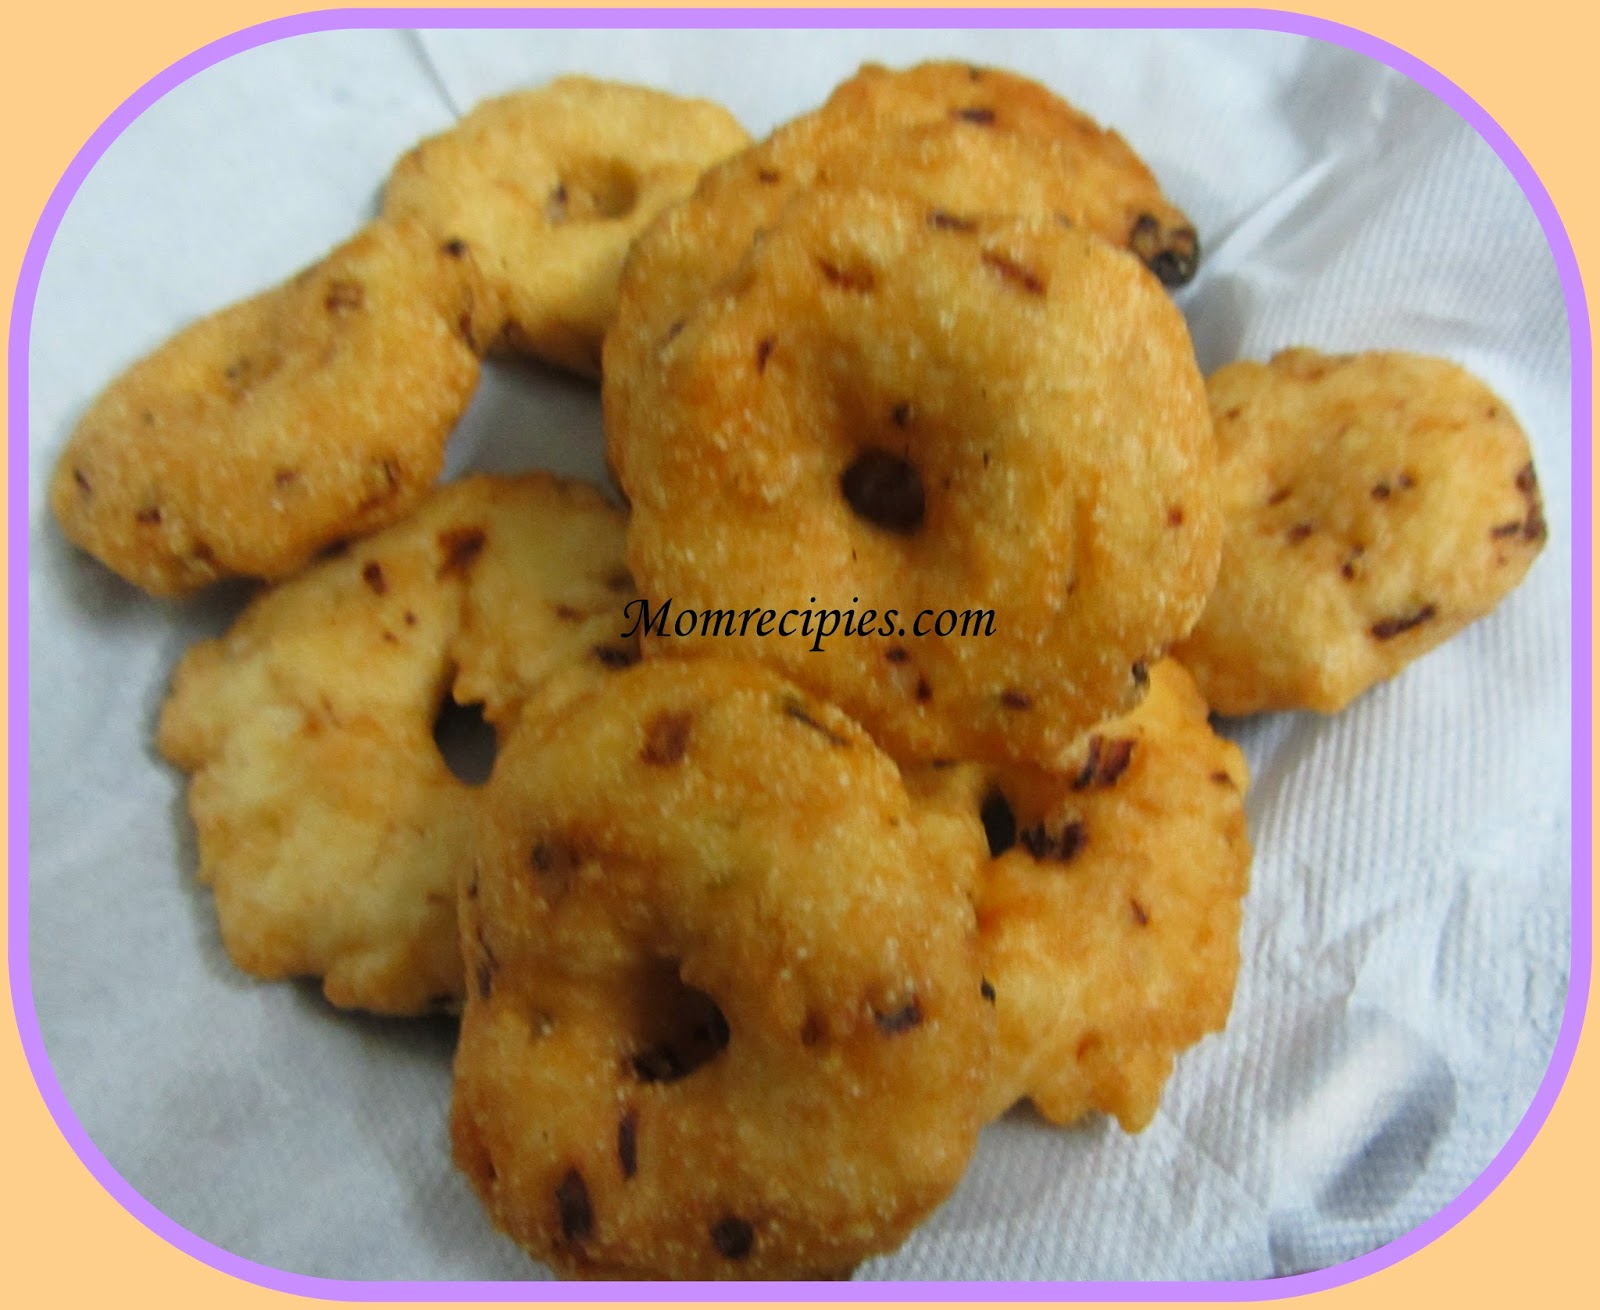
9) Slowly drop it into the hot oil carefully and deep fry it on both sides on medium heat to a golden brown colour.


 10)Remove with a slotted spoon and Drain on absorbent paper or kitchen tissues to remove excess oil.
 11) Repeat with the remaining batter to make more medu vadas.


Vadas without onion


Vadas After adding onion


12) Serve hot hot Vadas with Coconut Chutney or Sambar

Tips:- 

1) If your vadas soaks lot of oil ,then it means you have added more water,reduce next time. 
2) Try adding any one of the following -
one tsp of rice flour or gram flour to reduce vada drinking lot of  oil
3)If you could not shape the vadas  due to batter becoming sticky because of grinding for too long then keep the batter in refrigerator and try after two hours.

Dahi vada with Zero oil

A very popular dish all over India and each region in India has its own recipe for making these Vada’s. Typically the Vada’s have green chillies and ginger added to them. This recipe does not have them and vadas are fried in water instead of oil.This recipe is low in fat and less in calories and no cholesterol at all ,so you can eat as many as you want without giving up on your cravings.
My mother saw this recipe in television and she shared with me. I found this interesting and immediately came into my mind is Manasi's Healthy Cooking Event and I tried it. And really Dahi vadas came out very well and were really very tasty. It was hit in my family.All vadas finished within no time......so i thought of sharing with you all.......

Ingredients:
1 cup urad dal (black gram lentil without skin)
salt
Water

For Dahi:
4 Cups thick yogurt
1/4 water to whisk yogurt
1 tsp chat masala
1/2 tsp red chili powder
1 teaspoon freshly roasted and powdered cumin powder
salt
2 tsp sugar (according to sweetness)
Finely chopped coriander leaves
Date and Tamarind chutney for garnishing (optional)

Preparation of Vadas:
1. Soak urad dal for 4 hours and then grind it into smooth paste along with salt.
2. The batter should be thick enough. Grind using very less water.
3. Take a katori and cover its mouth with a wet cloth. Hold the cloth tight from below so as to get flat surface on top. Put 1 tbsp. of urad dal paste on the top of the wet cloth and slightly flatten it with wet hands. Make a small hole in the centre.
4. Heat water in a pan,water should be boiling drop slowly, vada in the boiling water . First vada will settle down at bottom and after few minutes it will come up.Keep it for 1 minute and then remove vada form pan.Similarly make all the badas. You can fry 5-6 badas at a time depending on how big is your kadhai.
Vadas settled in water

Vada in boiling water

Vada in boiling water coming up

Vadas after frying in water
5. Once you are done with all the badas,Place the Vada’s in a serving bowl and pour the yogurt mixture evenly over the Vada’s, covering them completely.
Refrigerate until serving.

Preparation of Dahi:
1. Whisk the yogurt by adding little water. It should be thick.
2. Add salt, sugar to it and keep it refrigerated for 1/2 hour.

Final Dahi Vada:


1. In a serving bowl, keep vadas and pour dahi on them.
2. Sprinkle it with chaat masala ,roasted cumin powder ,red chilli powder .
3. Garnish with chopped coriander and tamarind chutney. Serve cold.


These taste awesome......And they’re good for everyone as they are fried in water :-)

Usiri Avakaya / Indian Gooseberry Pickle / Amla Achar /Amla Pickle


Amla or Indian gooseberries are rich source of vitamin c & antioxidants. Hence good for treating colds. they are good for digestion too.It is used to make jam, murraba,pickles ,chutney and many more exotics .In winters we made its ready to eat pickle The process of making this gooseberry pickles is not complicated,hence you can make small batches and enjoy with your curd rice or you can even mix it with hot rice , Pappula podi and ghee.It tastes heavenly :)

Ingredients:-

Amla /Usirikaya /Indian Gooseberry - 1/2 Kg or 20 big sized ones
Tamarind  - 125 gms
Red Chilli Powder /Lal Mirch- 125 gms
Mustard seeds /Rai - 4 tsps
Fenugreek Seeds  /Methi- 2 tsps
Turmeric Powder /Haldi- 1 tsp
Salt - 135 gms
Asafoetida /Hing  -1/2 tsp
Oil - 125 gms
Dry Red Chillies - 8-9


Method:-


1) Wash goose berries/usirikayalu/amla  and wipe them properly with a  cotton cloth.  See that they are not wet.  Place them on a kitchen towel and allow them to dry for at least 20 to 30 min. Put some scars with knife to the amla.

Indian Gooseberries / Amla /Usurikaya
2) In a pan/kadai, dry roast the fenugreek seeds till they start to change color.Set aside the fenugreek seeds to cool.
3) Dry roast the mustard seeds .Cool them.
4) Grind the cooled, roasted fenugreek seeds and mustard seeds to a fine powder.
5) Soak tamarind for 20 mins then squeeze and make the tamarind pulp.
6) Heat oil in a pan. Add 8-9 red chillies and 1 tsp of mustard seeds  and hing . When mustard seeds crackle then add the usirikayalu/amla into it slowly.  Cook in a medium flame stirring at intervals for atleast 7-8 mins till amla gets light golden in colour .WHen Amla is half cooked add the tamarind pulp. Cook for another 7-8 mins or till amla gets squeezed. When Press a amla with a ladle and see whether it is cooked properly.Switch of the  flame and let it cool.


7) Now press each Usirikaya/amla with the help of a spoon and remove the seed inside.


8) While the oil  gets cool , add the asafoetida, mustard powder, fenugreek powder, salt, turmeric, and chilli powder.Mix well.


9) Let the uragai cool completely.
10) Transfer the uragai /pickle to a dry clean glass bottle or air tight glass jar.
11) You can use this  usiri avakaya immediately.


12) Serve with Curd Rice or Warm Rice and Ghee ,Sambar rice or dal rice combination.You can also serve this usiri avakaya with upma and dosa also.
13) Once the amla pickle is ready, keep outside or in the fridge. In cold climates, you can keep outside.In a hot and humid climate, keep in the fridge.
14) This Amla Pickle stays for 6 months to a year .

Lemon Pickle / Lime Pickle / Nimbu Ka Achaar


My family is a big pickle fan and off all the pickles they really like lemon pickle a lot .My daughter is crazy for this pickle.This is a very easy recipe with no-oil and no-cooking involve in this pickle and with only 3 ingredients .It's so difficult to resist this tangy, and tongue tickling pickle . Kids will enjoy this pickle very much :-)

Heading towards the recipe of Zero Oil ,no-cooking lemon pickle ...Here 

Ingredients:- 

    2 Kgs - Lemon
    3/4 Kg /2 Cups - Salt
    50 gms/ 1/4 Cup - Turmeric Powder


Method:-


1) Take out a glass or plastic jar that can hold about 1 kilo of pickle.  The jar should be completely dry.It is very important.


2) Wash the lemons and wipe them thoroughly. Make sure there is no water on the skin. Let them dry for some time.


3) Cut them into small bite sized cubes.
4)  10 lemons squeeze them and take the juice in a bowl.


 5)  In a bowl take the cut lemon pieces add salt , turmeric powder and lemon juice which we squeezed and mix all these well.


6) Take them in a clean, dry glass or porcelain jar or plastic jar with tight lid. Keep them tightly covered .Leave them as it is for 15 days.Then open the container and see if pickle is fine.As the pickle gets ready, the lemon pieces get softer.Close the lid again and leave it for about 30 - 45 days.

7) This time period depends on the thickness of lime rinds. If they are thin, they will soften up within a 15 days and if they are thick, they would take at least a month to 45 days.
8) My recipe is prepared with thin skinned, juicy limes and they changed from hard to firmly-soft in a month.
9) Serve and enjoy with curd rice or rice, dal and ghee .

Tips:-

1) Pickling is like making jam. Take extra precaution in using the dry utensils, jars, spoons and your hands. Using the wet or damp things is a sure way to spoil the pickle.
2) Better transfer small quantity in a smaller container which can be used to serve.

Chocolate Dosa / Kids Recipes

Chocolate Dosa is very easy and quick to prepare. Kids will love it very much. My Daughter is crazy fan of this Dosa. Its sweet ,crispy and chocolaty so noway kids will fuss over eating this.Make on weekends or as a treat to entertain your kids.It’s a yummy and irresistible dessert  and breakfast option for all chocolate lovers.

Ingredients :-

Dosa batter - 1 Cup
Oil -  4 tsps
Chocolate syrup or chocolate sauce or chocolate bar - 1

You can make a fabulous chocolate sauce with any amount of sweetened dark, semisweet, or bittersweet chocolate you have on hand.All you need is a  milk  ,cream, water, a pinch of salt, a few drops of vanilla, etc

Ingredients for Chocolate Sauce /Chocolate syrup :

6 ounces dark, semisweet, or bittersweet chocolate (chopped coarsely)
1/2 cup -Heavy cream 
1/2 cup -water 
2 tbsps -Unsalted butter
Pinch of salt
2-3 drops- Vanilla extract (optional)


Chocolate Sauce


Method for making Chocolate Sauce :-

1) In a medium heavy-bottomed pan on medium heat, bring the cream, water, and salt to a simmer, stirring occasionally. Just before it starts to boil, turn off the heat and remove the pan from the stove.
2) Add the chocolate , butter, vanilla extract stirring constantly with a spatula . Keep stirring until the chocolate and butter melt and the sauce is perfectly smooth.
3) If the sauce looks too thick then stir in more liquid gradually until the sauce is smooth and has the consistency you are looking for. 
4) Adjust the sauce with more liquid as necessary.
5) If the sauce is too bitter then you can mellow it  by stirring in a little soft butter or a little sugar.
6) Serve immediately, or reheat when ready to use.
7) The sauce keeps in a covered container in the fridge for several days.

Method for preparing Chocolate Dosa:-

1) Take a non-stick pan and place on medium-high heat. Test by sprinkling a few drops of water on it. Water should sizzle right away.
2) Apply little oil on the pan with half cut onion so that dosa doesn't stick to the pan.


3) Pour a two ladleful of dosa batter and quickly spread into a circle with a back of spoon.Starting from the center, spiral the batter outward evenly to form a circle about 5-7 inch in diameter.
4) Spread one teaspoon  of oil around the dosa and leave it for some time to cook about 30 seconds then flip the dosa using a flat spatula.


5) Quickly spread  a tbsp of the chocolate syrup or chocolate sauce  all over the dosa  with a spoon or spatula .

OR

Sprinkle grated  chocolate  all over the dosa and cook until chocolate melts.

6) Reduce the heat to medium and  cook dosa for few seconds.
7) Once the dosa is cooked, roll the dosa or fold it in half and serve it on a plate drizzled with chocolate syrup.


8) Now chocolate dosa is ready to enjoy :-)